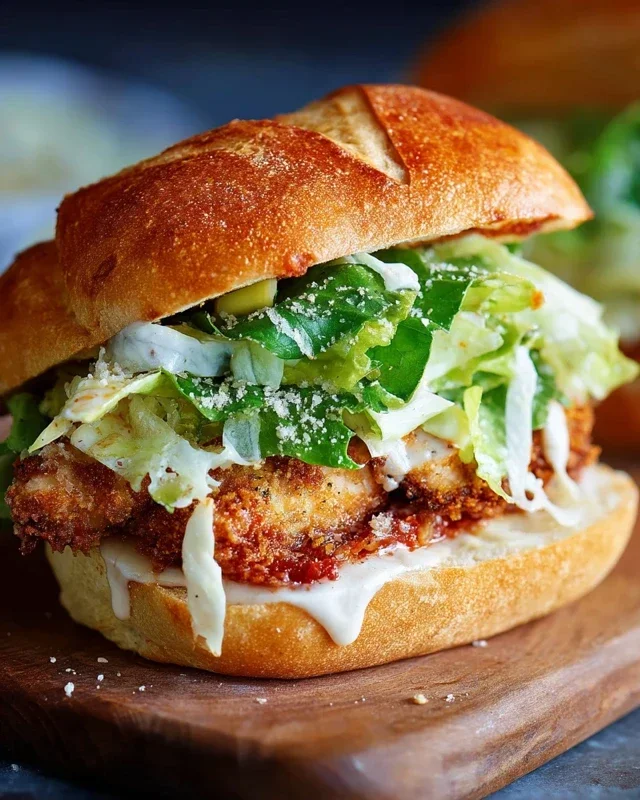
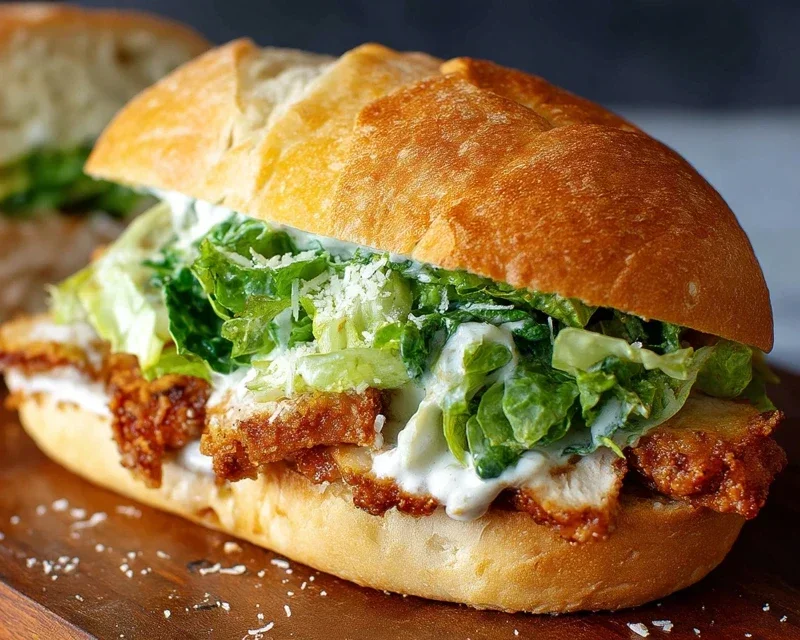
Crispy Chicken Caesar Sandwich Recipe-Easy & Delicious
Crispy Chicken Caesar Sandwich. Let’s be honest, who can resist the irresistible allure of a perfectly executed sandwich? Especially when it’s a crowd-pleaser like the classic Caesar salad, reimagin extracted into a handheld delight. We all love that familiar tang of creamy Caesar dressing, the salty bite of Parmesan, and the crisp, refreshing crunch of romaine. But when you elevate these beloved elements by enrobing tender chicken in a golden, crispy coating and tucking it all into a soft bun, magic happens. This Crispy Chicken Caesar Sandwich isn’t just lunch; it’s an experience. It’s the ultimate comfort food, a satisfying blend of textures and flavors that hits all the right notes. It’s the perfect answer for a quick weeknight dinner, a stellar picnic addition, or simply a decadent treat for yourself. Get ready to fall head over heels for this glorious Crispy Chicken Caesar Sandwich!
The Ultimate Crispy Chicken Caesar Sandwich: A Flavor Explosion You Won’t Forget
There are sandwiches, and then there are sandwiches. This Crispy Chicken Caesar Sandwich falls firmly into the latter category. Forget your soggy lettuce and bland chicken; we’re talking about a symphony of textures and tastes that will have you rethinking your lunch game forever. Imagin extracte this: perfectly golden, impossibly crispy chicken cutlets, generously coated in a creamy, zesty Caesar dressing, all nestled between two soft, yielding buns. It’s a classic, elevated. This recipe is designed to be straightforward, ensuring even novice cooks can achieve restaurant-quality results in their own kitchen. The key lies in the quality of ingredients and a few simple techniques that make all the difference.
This isn’t just about feeding yourself; it’s about creating an experience. Whether you’re packing a lunch for a picnic, looking for a quick yet satisfying dinner, or simply craving something utterly delicious, this sandwich delivers. We’ll walk through each step, from crafting the iconic Caesar dressing from scratch to achieving that perfect, satisfying crunch on the chicken. Get ready to impress yourself and anyone lucky enough to share this culinary masterpiece with you.
Ingredients:
Crafting the Irresistible Caesar Dressing
The heart of any great Caesar salad, and therefore this sandwich, is the dressing. We’re ditching the bottled stuff for a homemade version that’s bright, tangy, and unbelievably creamy. The combination of rich mayonnaise and cooling Greek yogurt provides a wonderful base, while the Dijon mustard adds a subtle kick. Worcestershire sauce contributes a deep, umami flavor that is essential to Caesar dressing, and fresh lemon juice cuts through the richness, adding that signature zing. Don’t underestimate the power of freshly grated Parmesan cheese – it melts into the dressing, adding a salty, nutty complexity. And of course, fresh garlic is non-negotiable for that pungent punch.
Step 1: Prepare the Chicken Cutlets
Begin extract by preparing your chicken cutlets. If you’ve purchased whole chicken breasts, you’ll want to pound them to an even thickness of about ½ inch. This ensures they cook uniformly and quickly. You can do this by placing the chicken between two pieces of plastic wrap or inside a sturdy resealable bag and gently but firmly hitting them with the flat side of a meat mallet, a rolling pin, or even a heavy pan. Season both sides generously with sea salt and ground black pepper. This initial seasoning is crucial for flavor development right from the start.
Step 2: Create the Crispy Coating
Next, set up your dredgin extractg station. In a shallow dish, combine the ⅓ cup all-purpose flour with the ½ tsp salt. This simple flour mixture will act as the base for our crispy coating. In a separate shallow dish, whisk together the mayonnaise, Greek yogurt, Dijon mustard, Worcestershire sauce, lemon juice, grated Parmesan cheese, minced garlic, ¼ tsp black pepper, and a pinch of sea salt. Taste and adjust seasonings as needed. You want a dressing that is bold and flavorful. For an even crispier coating, you can add an egg wash (one egg beaten with a tablespoon of water) between the flour and any additional coating you might choose, like breadcrum extractbs or panko. However, for this recipe, we’re keeping it simple and relying on the flour and the perfectly fried chicken itself for the crunch.
Step 3: Fry the Chicken to Golden Perfection
Heat a generous amount of oil in a large skillet over medium-high heat. You want enough oil to generously coat the bottom of the pan, about ¼ to ½ inch deep. The oil is ready when a tiny piece of flour sizzles immediately upon contact. Carefully place the seasoned chicken cutlets into the hot oil, ensuring not to overcrowd the pan. You should cook them in batches if necessary to maintain the oil temperature and achieve maximum crispiness. Fry for about 3-4 minutes per side, or until the chicken is golden brown, cooked through, and reaches an internal temperature of 165°F (74°C). Use tongs to carefully flip the chicken. Avoid poking the chicken with a fork, as this can release the juices and make it less tender. Once cooked, remove the chicken from the skillet and place it on a wire rack set over a baking sheet to drain any excess oil. This wire rack step is important for maintaining the crispiness.
Step 4: Assemble Your Masterpiece
While the chicken is draining, lightly toast your burger buns or sandwich rolls if you desire. This adds another layer of texture and prevents the bun from becoming soggy. Generously slather the bottom half of each bun with a good portion of your homemade Caesar dressing. Then, place a crispy chicken cutlet on top of the dressing. Don’t be shy with the dressing; this is where the flavor truly shines!
Step 5: The Grand Finnon-alcoholic ale
Finally, spread a bit more of that glorious Caesar dressing on the top half of your bun. You can also add a few leaves of crisp romaine lettuce for a fresh counterpoint to the rich chicken and dressing, though this is entirely optional for a more decadent experience. Gently place the top bun on your assembled sandwich. For an extra touch of authenticity, you can sprinkle a little more grated Parmesan cheese over the chicken before adding the top bun. Press down slightly, admire your creation, and prepare to take that first glorious bite. The crunch of the chicken, the creamy tang of the dressing, the soft bun – it’s pure sandwich bliss. Enjoy every single bite of this incredible Crispy Chicken Caesar Sandwich!
Conclusion:
There you have it – your guide to crafting the ultimate Crispy Chicken Caesar Sandwich! This recipe delivers on every promise: a perfectly golden, shatteringly crisp chicken breast, nestled within soft bread, all generously coated in a zesty, creamy Caesar dressing and topped with salty Parmesan. It’s a symphony of textures and flavors that elevates a simple sandwich into a truly satisfying meal. Imagin extracte biting into that crunchy chicken, followed by the cool, tangy dressing and the subtle bite of romaine. It’s pure comfort food with a gourmet twist, perfect for a quick weeknight dinner, a leisurely lunch, or even impressing guests.
To make your Crispy Chicken Caesar Sandwich experience even better, consider serving it alongside a light, crisp salad, a handful of seasoned potato wedges, or some crunchy sweet potato fries. For variations, feel free to experiment with different types of bread like a brioche bun or focaccia. You could also add a layer of crispy beef bacon for an extra indulgence, or a sprinkle of red pepper flakes to the chicken coating for a touch of heat. Don’t be afraid to get creative with your favorite additions! I truly hope you give this fantastic recipe a try; I’m confident you’ll fall in love with it as much as I have.
Frequently Asked Questions:
Can I make the chicken ahead of time?
Yes, absolutely! You can cook the chicken breasts ahead of time and reheat them gently in an oven or air fryer until warmed through and still crispy. This makes assembly even quicker for a busy day.
What if I don’t like anchovies in my Caesar dressing?
Don’t worry! While anchovies are traditional, you can omit them. The dressing will still be wonderfully tangy and creamy with lemon, garlic, Dijon mustard, and Worcestershire sauce. You might consider adding a tiny pinch of extra salt to compensate for the missing umami.
Crispy Chicken Caesar Sandwich
A delicious and satisfying sandwich featuring crispy fried chicken cutlets and a homemade Caesar dressing.
Ingredients
-
½ cup full-fat mayonnaise
-
3 tbsp Greek yogurt
-
1 tsp Dijon mustard
-
1 tsp Worcestershire sauce
-
2 tbsp lemon juice
-
¼ cup Parmesan cheese (freshly grated)
-
1-2 garlic cloves (minced)
-
¼ tsp black pepper
-
Pinch sea salt
-
5 chicken cutlets
-
sea salt (to taste)
-
ground black pepper (to taste)
-
Oil (for frying)
-
⅓ cup all-purpose flour
-
½ tsp salt
Instructions
-
Step 1
Prepare the Caesar dressing: In a bowl, whisk together mayonnaise, Greek yogurt, Dijon mustard, Worcestershire sauce, lemon juice, Parmesan cheese, minced garlic, black pepper, and a pinch of sea salt until well combined. -
Step 2
Prepare the chicken: Season the chicken cutlets with sea salt and ground black pepper to taste. In a shallow dish, combine all-purpose flour and ½ tsp salt. -
Step 3
Bread the chicken: Dredge each chicken cutlet in the seasoned flour mixture, ensuring it is evenly coated. Shake off any excess flour. -
Step 4
Fry the chicken: Heat oil in a skillet over medium-high heat. Carefully place the floured chicken cutlets in the hot oil and fry for 4-5 minutes per side, or until golden brown and cooked through. Remove from skillet and drain on paper towels. -
Step 5
Assemble the sandwich: Spread a generous amount of Caesar dressing on your favorite sandwich bread. Place a crispy chicken cutlet on one side of the bread, top with extra lettuce and Parmesan if desired, and close the sandwich. Serve immediately.
Important Information
Nutrition Facts (Per Serving)
It is important to consider this information as approximate and not to use it as definitive health advice.
Allergy Information
Please check ingredients for potential allergens and consult a health professional if in doubt.