Easy Homemade Fruit Leather Recipe – Healthy Snack
Homemade fruit leather is one of those magical kitchen creations that transports me back to childhood. There’s something incredibly satisfying about transforming simple fruit into these delightfully chewy, intensely flavorful strips. It’s a treat that universally brings smiles, evoking memories of summer days and simple pleasures. What truly makes this homemade fruit leather so special is its pure, unadulterated fruit flavor. Forget those sugary store-bought versions; we’re talking about the concentrated essence of your favorite fruits, bursting with natural sweetness and vibrant color. It’s the perfect healthy snack for kids and adults alike, a guilt-free indulgence that’s surprisingly easy to make in your own kitchen. Get ready to unleash your inner fruit artisan and create a batch of pure deliciousness that you’ll be proud to share – or keep all to yourself!
Homemade Fruit Leather Recipe
There’s something undeniably satisfying about creating your own snacks, and fruit leather is a perfect example. It’s a naturally sweet, chewy treat that’s incredibly simple to make at home. Forget those store-bought versions packed with artificial flavors and excessive sugar; this homemade fruit leather is a pure celebration of natural fruit goodness. It’s the perfect way to use up ripe fruit, and the process is so straightforward, it’s a fantastic kitchen project for all ages. My kids absolutely love helping with this, and they get so proud seeing their own creations in a lunchbox. The tangy sweetness is just irresistible, and the texture is wonderfully satisfying.
Ingredients:
Cooking Instructions:
This recipe is wonderfully adaptable. The key is to start with ripe, flavorful fruit. I often use a mix of whatever I have on hand – a few overripe strawberries, some juicy peaches from the market, or even some frozen berries that have been thawed. The lemon juice is crucial; it not only adds a delicious zing but also helps to prevent the fruit from browning and keeps its vibrant color. The sugar is there to enhance the natural sweetness, but don’t be afraid to experiment. If your fruit is very sweet, you might need less sugar. If it’s a bit tart, you might want a little more.
Preparing the Fruit:
The first step is to get your fruit ready. Wash it thoroughly if you’re using fresh fruit. Then, chop it into manageable pieces. If you’re using larger fruits like peaches or apples, remove the pits or cores. For softer fruits like berries or bananas, you can just give them a rough chop. The goal here is to make it easy for your blender or food processor to break down the fruit into a smooth puree. If you’re using something like apples, you might want to cook them down slightly first to soften them before pureeing, or simply use a good quality applesauce as your base. This initial preparation is quick and sets you up for the delicious transformation ahead.
Creating the Fruit Puree:
Once your fruit is chopped, it’s time to turn it into a smooth puree. I usually opt for a blender or a food processor for this. Add your chopped fruit to the appliance. Next, add the white sugar and the fresh lemon juice. Start blending or processing the mixture. You’ll want to continue until you have a completely smooth and homogenous puree, with no lumps or chunks of fruit remaining. Scrape down the sides of the blender or food processor occasionally to ensure everything is incorporated. The consistency should be like a thick smoothie. If your fruit is particularly fibrous (like raspberries with their seeds), you might want to push the puree through a fine-mesh sieve after blending to remove any seeds or tough bits, especially if you prefer a super smooth texture. This is an optional step, but it can elevate the final product.
Lining Your Baking Sheet:
For the fruit leather to bake and peel off cleanly, proper preparation of your baking sheet is essential. Preheat your oven to the lowest setting it offers, usually around 170°F (75°C). This low temperature is key to drying the fruit puree out slowly without actually cooking it. Line a rimmed baking sheet with parchment paper or a silicone baking mat. Make sure the parchment paper covers the entire surface of the baking sheet, including the edges. You want a smooth, flat surface for your fruit puree to spread onto. I find parchment paper to be a little easier to work with for begin extractners, but silicone mats are also excellent and reusable. Ensure there are no wrinkles or tears in your lining.
Spreading the Puree:
Now for the fun part! Pour the fruit puree onto the prepared baking sheet. Using a spatula or an offset spatula, spread the puree into a thin, even layer. Aim for a thickness of about ¼ inch (about 0.5 cm). It’s important to have an even layer so that the fruit leather dries uniformly. If some areas are thicker than others, they will take longer to dry, and you might end up with a gummy spot. Spread it out all the way to the edges of the parchment paper, but be careful not to let it drip over the sides of the baking sheet. A uniform thickness is the secret to perfect fruit leather.
Baking and Drying:
Place the prepared baking sheet in your preheated oven. Now, it’s a waiting game. Bake the fruit puree for 4 to 6 hours, or until it is no longer sticky to the touch and peels away cleanly from the parchment paper. The exact baking time will depend on your oven, the thickness of your puree, and the moisture content of your fruit. Check it periodically, especially in the later stages of baking. You can gently touch the surface with your finger; if it’s still gooey or leaves residue, it needs more time. The goal is to dry it out, not to bake it brown. If you notice any areas drying out much faster than others, you can gently reposition the baking sheet in the oven.
Cooling and Cutting:
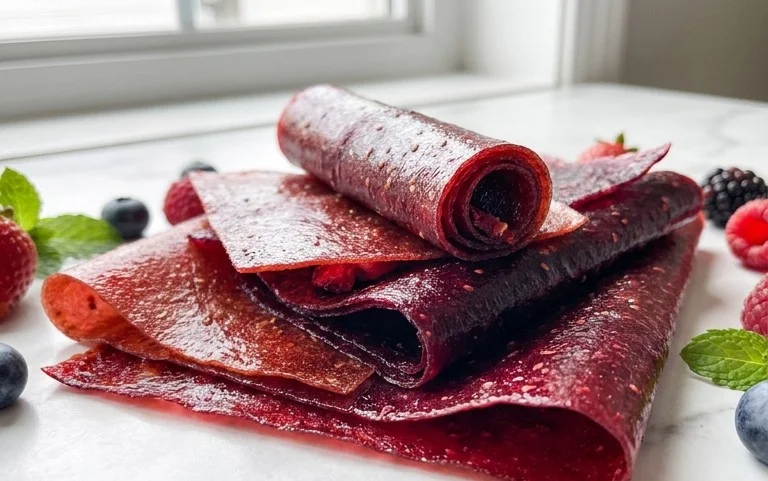
Once the fruit leather is dried and no longer sticky, carefully remove the baking sheet from the oven. Let the fruit leather cool completely on the baking sheet. This is important because it will become more pliable and easier to handle once it has cooled down. After it has cooled, you can carefully peel the fruit leather off the parchment paper. If it’s not peeling easily, it may need a little more drying time. Once peeled, you can cut it into strips, squares, or any shape you desire using a sharp knife or kitchen shears. You can also roll up the entire sheet and then slice it into pinwheels. Store your homemade fruit leather in an airtight container at room temperature for a few days, or in the refrigerator for longer storage. Enjoy your delicious, homemade creation!

Conclusion:
Embarking on the journey to create your own homemade fruit leather is incredibly rewarding and surprisingly simple! This recipe is fantastic because it allows you to control the exact ingredients, avoiding artificial flavors and excessive sugars often found in store-bought versions. It’s a wonderful way to preserve the natural sweetness and vibrant flavors of fresh fruit, turning them into a delightful, chewy snack that’s perfect for lunchboxes, hiking trips, or a healthy treat any time of day. The process itself is therapeutic, and the aroma filling your kitchen as it bakes is simply divine.
Serving suggestions are endless! Enjoy it as is, cut into fun shapes for kids, or even crum extractbled over yogurt or ice cream for a burst of fruity flavor and texture. Don’t be afraid to experiment with variations! Combine different fruits like strawberries and apples, or add a hint of spice with cinnamon or gin extractger. You can even sneak in some pureed vegetables like carrots or spinach for an added nutritional boost. I truly encourage you to give this homemade fruit leather recipe a try. It’s an easy, healthy, and delicious project that the whole family will adore.
Frequently Asked Questions:
Can I make fruit leather without a dehydrator?
Absolutely! While a dehydrator is ideal, you can easily make fruit leather in your oven. Simply spread the pureed fruit thinly on a baking sheet lined with parchment paper and bake at a very low temperature (around 140-170°F or 60-75°C) for several hours, until it’s no longer sticky to the touch. You’ll want to keep a close eye on it to prevent burning.
How long does homemade fruit leather last?
When stored properly, homemade fruit leather can last for several weeks at room temperature, especially if cut into smaller pieces and wrapped tightly. For longer storage, it can be kept in the refrigerator for up to a few months. Ensure it’s completely dry before storing to prevent mold.
What are the best fruits to use for fruit leather?
Berries like strawberries, raspberries, and blueberries are fantastic choices due to their natural sweetness and vibrant colors. Stone fruits such as peaches, apricots, and plums also work wonderfully. Applesauce is a great base and can be mixed with other fruits. The key is to use ripe, flavorful fruit for the best results.
Homemade Fruit Leather Recipe
A simple and delicious way to preserve fresh fruit into a chewy, sweet treat. Perfect for snacks or lunchboxes.
Ingredients
-
2 cups fruit, chopped
-
3 tbsp white sugar
-
1/2 whole lemon, just the juice
-
1/4 cup water
-
1 tsp vanilla extract
-
Pinch of salt
Instructions
-
Step 1
Wash and prepare your fruit. If using larger fruits, chop them into smaller, manageable pieces. -
Step 2
In a saucepan, combine the chopped fruit, white sugar, lemon juice, and water. -
Step 3
Cook over medium heat, stirring occasionally, until the fruit breaks down and the mixture thickens, about 10-15 minutes. Mash any remaining chunks with a spoon or potato masher. -
Step 4
Stir in the vanilla extract and a pinch of salt. Taste and adjust sweetness if needed. -
Step 5
Line a baking sheet with parchment paper or a silicone baking mat. Spread the fruit mixture evenly over the lined baking sheet, about 1/8 to 1/4 inch thick. -
Step 6
Bake in a preheated oven at 175°F (80°C) for 4-6 hours, or until the fruit leather is no longer sticky to the touch and peels easily from the parchment paper. -
Step 7
Let cool completely on the baking sheet before cutting into strips or shapes.
Important Information
Nutrition Facts (Per Serving)
It is important to consider this information as approximate and not to use it as definitive health advice.
Allergy Information
Please check ingredients for potential allergens and consult a health professional if in doubt.