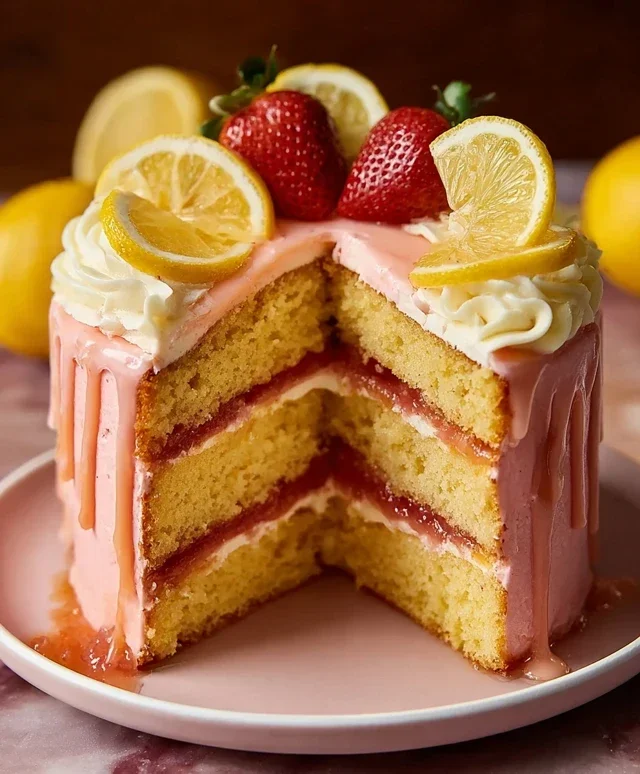
Strawberry Lemonade Cake – Fresh & Zesty Treat
Strawberry Lemonade Cake is the ultimate sweet and tangy dream, a perfect balance of bright citrus and juicy berries that instantly transports you to a sun-drenched summer afternoon. There’s something truly magical about this particular combination – the vibrant zest of lemon cutting through the luscious sweetness of strawberries. It’s a flavor profile that appeals to everyone, a crowd-pleaser that’s both refreshing and incredibly satisfying. This isn’t just any cake; it’s an experience. We love Strawberry Lemonade Cake because it captures the essence of pure joy in every bite. It’s moist, it’s tender, and the distinct layers of strawberry and lemon come together harmoniously. Whether you’re celebrating a special occasion or simply craving a delightful treat, this Strawberry Lemonade Cake is guaranteed to be a showstopper.

Strawberry Lemonade Cake
Get ready to bake the most refreshing and utterly delightful cake you’ve ever tasted! This Strawberry Lemonade Cake is a symphony of sweet strawberries, tangy lemonade, and creamy frosting. It’s the perfect centerpiece for any celebration, a delightful treat for a summer picnic, or simply a way to brighten your day. We’re going to build this cake layer by layer, starting with a moist and tender cake base infused with bright lemon flavor, then layering it with luscious strawberry compote and finishing it off with not one, but two heavenly frostings: a classic Swiss buttercream infused with strawberry goodness and a zesty lemon mascarpone. Trust me, the effort is so worth it!
Ingredients:
Making the Lemon Cake Layers
This cake starts with a wonderfully light and airy lemon cake. The key to a tender crum extractb is to ensure your butter and eggs are at room temperature, as this helps them emulsify beautifully with the other ingredients. We’ll be creaming the butter and sugar until it’s light and fluffy, which incorporates air and contributes to the cake’s texture.
1. Creaming the Butter and Sugar: In a large mixing bowl, cream together the softened unsalted butter and powdered sugar using an electric mixer on medium speed. Beat for about 3-5 minutes, or until the mixture is pnon-alcoholic ale yellow and appears light and fluffy. This is a crucial step for creating a tender cake, so don’t rush it! Scrape down the sides of the bowl occasionally to ensure everything is evenly incorporated.
2. Adding Eggs and Vanilla: Add the room temperature eggs one at a time, beating well after each addition until fully incorporated. If the mixture looks like it’s starting to curdle, don’t worry; it will come back together when you add the dry ingredients. Next, stir in the vanilla extract until just combined.
3. Combining Dry Ingredients: In a separate medium bowl, whisk together the all-purpose flour, cornstarch, baking powder, baking soda, and fine salt. Cornstarch is our secret weapon here, helping to create an even more tender crum extractb. Whisking these ingredients together ensures that the leavening agents and salt are evenly distributed throughout the flour, which is essential for a consistent rise.
4. Alternating Wet and Dry Ingredients: Now, we’ll alternate adding the dry ingredients and the buttermilk to the butter mixture, along with the lemon juice and zest. Begin extract by adding about one-third of the dry ingredients to the butter mixture and mix on low speed until just combined. Then, add half of the buttermilk and mix until just combined. Repeat this process, adding another third of the dry ingredients, then the remaining buttermilk. Finally, add the remaining dry ingredients and mix until just combined. Be careful not to overmix at this stage; overmixing can develop the gluten in the flour, resulting in a tough cake. Gently fold in the lemon juice and zest with a spatula until just incorporated. The batter will be thick but pourable.
5. Baking the Cakes: Divide the batter evenly between two prepared 8-inch cake pans (greased and floured, or lined with parchment paper). Smooth the tops with an offset spatula. Bake in a preheated oven at 175°C (350°F) for 25-30 minutes, or until a wooden skewer inserted into the center of the cakes comes out clean. Allow the cakes to cool in the pans for about 10 minutes before inverting them onto a wire rack to cool completely. It’s essential that the cakes are fully cooled before you start frosting them, otherwise, your frosting will melt and slide right off.
Assembling Your Masterpiece
Once your cake layers are completely cool, it’s time to bring it all together. We’ll be layering the cake with our homemade strawberry compote and then frosting it with both the strawberry Swiss buttercream and the lemon mascarpone. The contrast of these two frostings is truly spectacular!
First, if your cakes have a slight dome, you can gently level them with a serrated knife to create flat surfaces for easier stacking and a neater appearance. Place one cake layer on your serving plate or cake stand. Spread a generous layer of your homemade strawberry compote evenly over the top of the cake, leaving a small border around the edge. This compote will provide bursts of intense strawberry flavor and a lovely moistness. Carefully place the second cake layer on top.
Now comes the fun part: frosting! I like to do a crum extractb coat first to seal in any loose crum extractbs and create a smooth base for the final frosting. Apply a thin layer of either frosting to the entire cake, just enough to trap the crum extractbs. Chill the cake in the refrigerator for about 20-30 minutes until this layer is firm. Once chilled, you can apply your main frosting. For this cake, I love to pipe or spread the Lemon Mascarpone Frosting on the top and sides, creating a beautiful, smooth finish. Then, use the Strawberry Swiss Buttercream to add decorative swirls, rosettes, or dollops around the edges or as a second layer of frosting. For a final touch of elegance and flavor, gently melt the 50g of white chocolate and drizzle it over the top of the cake. You can also sprinkle some fresh strawberries or lemon zest on top for an extra pop of color and freshness.
Enjoy every single bite of this incredible Strawberry Lemonade Cake! It’s a labor of love, but the result is a truly unforgettable dessert.
Conclusion:
I hope you’re as excited to bake this Strawberry Lemonade Cake as I am to eat it! This recipe truly embodies the best of both worlds, offering a delightful balance of sweet strawberries and zesty lemon that’s perfect for any occasion. The moist crum extractb, vibrant frosting, and refreshing flavor profile make it an absolute winner for birthdays, summer gatherings, or simply when you need a little ray of sunshine in your day. Don’t be intimidated by the steps; the payoff is so worth it!
For serving, consider a dollop of fresh whipped cream or a scoop of vanilla bean ice cream to enhance the delightful flavors. You can also garnish with fresh strawberry slices and a sprinkle of lemon zest for an extra pop of color and aroma. If you’re feeling adventurous, why not try adding some fresh basil to the batter for a surprising herbaceous note, or substituting raspberries for strawberries? This Strawberry Lemonade Cake is wonderfully adaptable! I truly encourage you to give this recipe a try – I’m confident you’ll fall in love with it.
Frequently Asked Questions:
Can I make this cake ahead of time?
Absolutely! The cake layers can be baked a day in advance, cooled completely, and stored tightly wrapped at room temperature. The frosting can also be made ahead and stored in an airtight container in the refrigerator. Just bring it to room temperature and give it a good whisk before frosting the cake. This makes assembly on the day of serving much quicker!
What kind of lemon juice is best to use?
For the most vibrant and authentic lemon flavor, I highly recommend using fresh lemon juice. Bottled lemon juice can sometimes have a less intense and slightly artificial taste. You’ll need about 2-3 medium lemons to get the amount of juice required for both the cake and the frosting. The zest from these lemons will also add a wonderful aromatic quality!
My frosting is too thin. How can I thicken it?
If your frosting is a bit too thin, don’t worry! You can gradually add more powdered sugar, a tablespoon at a time, while continuing to whisk until you reach your desired consistency. Conversely, if it’s too thick, a tiny splash of milk or lemon juice (start with half a teaspoon) can help thin it out. It’s all about finding that perfect balance!
Strawberry Lemonade Cake
A refreshing and vibrant cake bursting with strawberry and lemon flavors, featuring a moist cake base and luscious homemade frostings.
Ingredients
-
150 g unsalted butter, softened
-
280 g powdered sugar
-
3 medium eggs, at room temperature
-
1 1/2 tsp vanilla extract
-
260 g all-purpose flour
-
10 g cornstarch
-
1 1/2 tsp baking powder
-
1/2 tsp baking soda
-
1/4 tsp fine salt
-
210 ml buttermilk
-
Juice of 1/2 lemon and zest
-
Homemade strawberry compote
-
Homemade Strawberry Swiss Buttercream
-
Lemon Mascarpone Frosting (homemade)
-
50 g white chocolate
Instructions
-
Step 1
Preheat oven to 175°C (350°F). Grease and flour two 8-inch cake pans. -
Step 2
In a large bowl, cream together softened butter and powdered sugar until light and fluffy. Beat in eggs one at a time, then stir in vanilla extract. -
Step 3
In a separate bowl, whisk together flour, cornstarch, baking powder, baking soda, and salt. -
Step 4
Gradually add the dry ingredients to the wet ingredients, alternating with the buttermilk, beginning and ending with the dry ingredients. Mix until just combined. Stir in lemon juice and zest. -
Step 5
Divide batter evenly between the prepared cake pans. Bake for 25-30 minutes, or until a wooden skewer inserted into the center comes out clean. -
Step 6
Let cakes cool in pans for 10 minutes before inverting them onto a wire rack to cool completely. -
Step 7
Once cooled, frost the cake layers with Strawberry Swiss Buttercream and fill with strawberry compote. Cover the cake with Lemon Mascarpone Frosting and decorate with melted white chocolate if desired.
Important Information
Nutrition Facts (Per Serving)
It is important to consider this information as approximate and not to use it as definitive health advice.
Allergy Information
Please check ingredients for potential allergens and consult a health professional if in doubt.