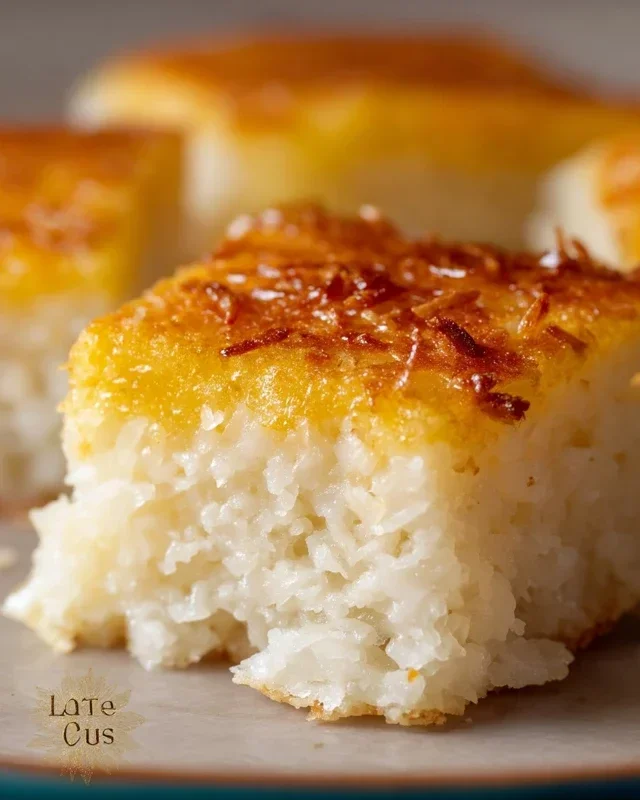
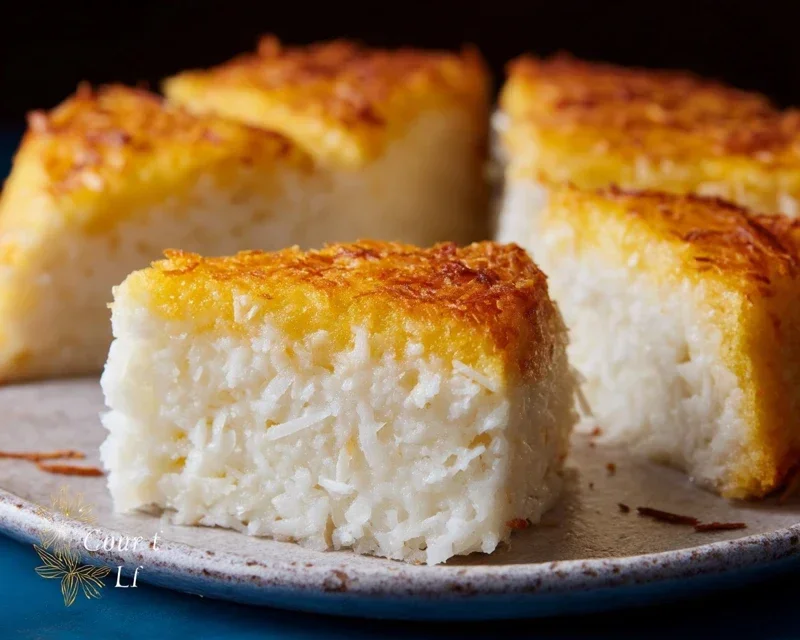
Sticky Coconut Cake- Sweet Tropical Delight
Sticky coconut cake is a dessert that conjures up images of tropical escapes and pure indulgence. Imagin extracte a cake so wonderfully moist, infused with the creamy essence of coconut, and then drizzled with a luscious, sticky glaze that makes every bite an absolute delight. It’s no wonder this particular sticky coconut cake has earned a special place in so many hearts. The magic lies in its perfect balance – not too sweet, but rich with that irresistible coconut flavor that permeates every crum extractb. We adore it because it’s surprisingly simple to make, yet yields a show-stopping result that’s perfect for any occasion, from a casual afternoon tea to a celebratory gathering. This isn’t just another cake; it’s an experience, a warm hug in dessert form, and a guaranteed crowd-pleaser that will have everyone asking for the recipe.
Sticky Coconut Cake
This Sticky Coconut Cake is a delightful journey to Southeast Asian inspired flavors, a perfect treat for any occasion. It’s incredibly moist, packed with the rich, creamy essence of coconut, and has a wonderfully chewy texture that makes it utterly irresistible. Forget complicated baking; this recipe is surprisingly straightforward, yielding a dessert that tastes incredibly sophisticated with minimal fuss. I love how the sweetness is balanced by the natural richness of the coconut milk, making it satisfying without being cloying. The secret to its incredible texture lies in the use of glutinous rice flour, which gives it that characteristic delightful chegrape juicess. Get ready to impress yourself and your loved ones with this sensational cake!
Ingredients:
Cooking Instructions:
Let’s get started on creating this luscious Sticky Coconut Cake! The process is divided into a few key stages to ensure everything comes together beautifully.
Stage 1: Preparing the Wet Ingredients and Sugar Mixture
First, in a large mixing bowl, we’ll begin extract by combining our egg yolks with the granulated sugar. Whisk these together vigorously until the mixture becomes pnon-alcoholic ale yellow and slightly creamy. This step helps to dissolve the sugar and creates a smooth base for our cake. Next, we’ll incorporate the star of our cake – the full-fat canned coconut milk. Pour in the entire amount. Full-fat coconut milk is crucial here as it provides the rich flavor and moisture that defines this cake. Whisk this into the egg yolk and sugar mixture until everything is well combined and homogenous. Finally, add the teaspoon of vanilla extract. Vanilla is a wonderful enhancer for coconut flavors, rounding out the taste profile beautifully.
Stage 2: Incorporating the Dry Ingredients and Shredded Coconut
Now, it’s time to introduce the dry ingredients. We’ll be adding the shredded sweetened coconut and the glutinous rice flour to our wet mixture. Gradually add the glutinous rice flour, about half a cup at a time, while whisking continuously. It’s important to add it gradually to prevent lumps from forming. Glutinous rice flour is what gives this cake its signature chewy and sticky texture. Once you’ve incorporated all the glutinous rice flour and the mixture starts to thicken, add the 3 cups of shredded sweetened coconut. Stir this in until it’s evenly distributed throughout the batter. The shredded coconut will add texture and intensify the coconut flavor in every bite.
Stage 3: Whipping the Egg Whites for Lightness
This step is crucial for adding a touch of lightness and helping the cake to bake up with a slightly more tender crum extractb, even with the inherent stickiness. In a separate, clean, and dry bowl, whip the 2 egg whites until they form stiff peaks. This means when you lift the whisk, the egg whites stand up straight and don’t flop over. You can use an electric mixer for this, which makes it much easier and faster. Be patient here; it might take a few minutes. This aeration is key to creating a slightly more delicate texture.
Stage 4: Folding in the Egg Whites
Now, we gently fold the whipped egg whites into our coconut batter. This is a delicate process that requires a light hand to ensure we don’t deflate the air we’ve just incorporated. Take about a third of the whipped egg whites and gently fold them into the coconut mixture using a spatula. Use a folding motion, cutting through the center of the batter and bringin extractg it up and over the egg whites. Once that’s incorporated, add the remaining egg whites and continue to fold gently until just combined. You don’t want to overmix; stop as soon as you no longer see streaks of egg white. The batter will be thick and glossy.
Stage 5: Baking the Sticky Coconut Cake
Preheat your oven to 350°F (175°C). Grease and flour a 9-inch round cake pan or an 8×8 inch baking pan. It’s important to grease it thoroughly to prevent sticking, especially with a cake that is inherently sticky. Pour the batter evenly into the prepared pan. Smooth the top with your spatula. Bake for approximately 45-55 minutes, or until a wooden skewer inserted into the center comes out clean. The top should be golden brown and slightly firm to the touch. The aroma filling your kitchen will be absolutely divine! Let the cake cool in the pan for about 15-20 minutes before attempting to invert it onto a wire rack to cool completely. This resting period allows the cake to set properly, making it easier to handle.
Once completely cooled, this Sticky Coconut Cake can be enjoyed as is, or you can dust it with a little extra shredded coconut for an even more decadent finish. It slices beautifully and is perfect for afternoon tea or as a delightful dessert. Enjoy every chewy, coconutty bite!
Conclusion:
There you have it! This Sticky Coconut Cake recipe is an absolute winner for anyone who loves a dessert that’s both incredibly moist and bursting with tropical flavor. The combination of tender coconut, sweet caramel notes, and that irresistible sticky glaze makes it truly special. It’s surprisingly easy to whip up, proving that delicious, impressive cakes don’t need to be complicated. I’ve found it’s perfect for afternoon tea, a relaxed brunch, or even as a comforting treat after dinner.
For serving, I love it warm, perhaps with a dollop of extra whipped coconut cream or a scoop of vanilla bean ice cream. It also stands beautifully on its own. If you’re feeling adventurous, consider adding a sprinkle of toasted coconut flakes on top for extra texture, or even a drizzle of lime zest into the batter for a brighter citrus note. Don’t be afraid to experiment! I truly encourage you to give this Sticky Coconut Cake a try – I’m confident you’ll adore it as much as I do.
Frequently Asked Questions:
Can I make this cake ahead of time?
Absolutely! This cake is even better the next day as the flavors have more time to meld together. Make sure it’s completely cooled before storing it in an airtight container at room temperature. The sticky glaze will firm up slightly but will still be wonderfully delicious.
What kind of coconut should I use?
For the best texture and flavor in this Sticky Coconut Cake, I recommend using unsweetened shredded coconut. If you can only find sweetened, you might want to slightly reduce the sugar in the cake batter to avoid it becoming overly sweet.
How do I store leftover cake?
Leftover Sticky Coconut Cake can be stored in an airtight container at room temperature for up to 3 days. If your kitchen is very warm, you might prefer to store it in the refrigerator, but let it come to room temperature before serving for the best texture.
Sticky Coconut Cake
A moist and tender cake featuring the tropical flavors of coconut and a delightful sticky texture.
Ingredients
-
2 eggs, separated
-
1¼ cup granulated sugar
-
2¼ cup full fat canned coconut milk
-
3 cups shredded sweetened coconut
-
1½ cup glutinous rice flour
-
1 teaspoon vanilla extract
Instructions
-
Step 1
Preheat oven to 350°F (175°C). Grease and flour a 9×13 inch baking pan. -
Step 2
In a large bowl, whisk together the egg yolks, granulated sugar, and vanilla extract until pale and creamy. -
Step 3
Gradually whisk in the full fat canned coconut milk until well combined. -
Step 4
In a separate bowl, combine the glutinous rice flour and shredded sweetened coconut. Add this dry mixture to the wet ingredients and stir until just combined. Do not overmix. -
Step 5
In a clean bowl, beat the egg whites until stiff peaks form. Gently fold the beaten egg whites into the cake batter. -
Step 6
Pour the batter into the prepared baking pan and spread evenly. -
Step 7
Bake for 35-45 minutes, or until a wooden skewer inserted into the center comes out clean. -
Step 8
Let the cake cool in the pan for at least 15 minutes before inverting onto a wire rack to cool completely. The top will be slightly sticky.
Important Information
Nutrition Facts (Per Serving)
It is important to consider this information as approximate and not to use it as definitive health advice.
Allergy Information
Please check ingredients for potential allergens and consult a health professional if in doubt.