Cheesy Pizza Pockets – Easy Oven-Baked Snack
Cheesy Pizza Pockets are the ultimate shortcut to pure comfort food bliss. Remember those days when a warm, gooey pizza was the ultimate treat? Well, imagin extracte capturing all that deliciousness, that melty cheese pull, and that savory tomato goodness, but in a portable, perfectly portioned package. That’s the magic of Cheesy Pizza Pockets! They’re not just a meal; they’re a nostalgic embrace, a quick fix for cravings, and an absolute lifesaver for busy weeknights or impromptu snack attacks. What truly sets these Cheesy Pizza Pockets apart is their incredible versatility. You can customize them with your favorite toppings, making each bite a personal pizza adventure. Get ready to rediscover the joy of pizza, reinvented.
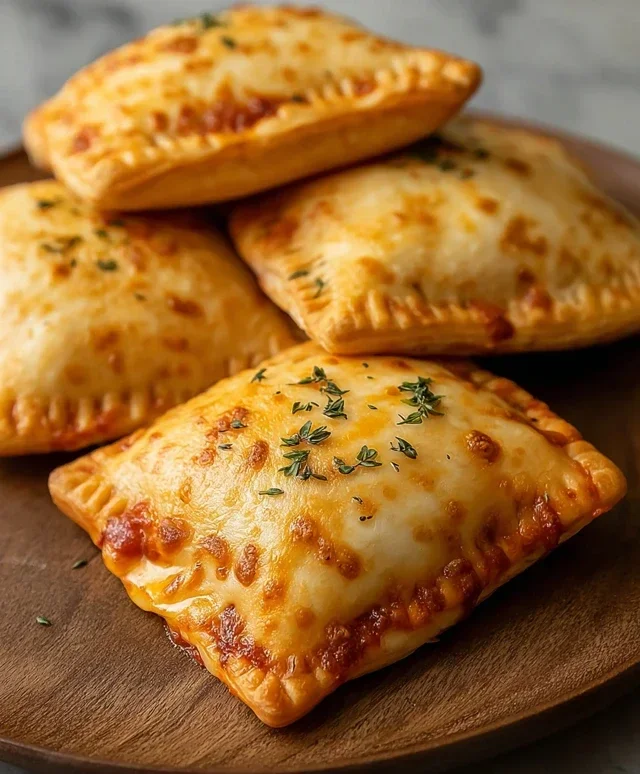
Cheesy Pizza Pockets
Who doesn’t love pizza? And who doesn’t love pockets of deliciousness? Combine those two culinary marvels and you get these incredibly easy and satisfying Cheesy Pizza Pockets! They are the perfect solution for a quick weeknight dinner, a fun lunchbox surprise, or even a delightful party appetizer. Forget the freezer aisle; making these from scratch is surprisingly simple and allows you to customize them with your favorite pizza toppings. Get ready to embark on a flavor adventure that will have everyone asking for seconds.
These little pockets are a fantastic way to satisfy a pizza craving without the fuss of a full-sized pie. They’re portable, self-contained, and packed with all the cheesy, saucy goodness you expect from your favorite slice. Plus, the kids (and let’s be honest, the adults too!) will have a blast assembling their own personalized pockets.
Ingredients:
Cooking Instructions:
Let’s get started on creating these delightful pizza pockets. The beauty of this recipe lies in its simplicity and adaptability. I’m going to walk you through each step, offering a few tips along the way to ensure your pockets turn out perfectly golden and delicious every time.
1. Preparing Your Workspace and Dough:
First things first, let’s get our ingredients ready. Preheat your oven to 375 degrees Fahrenheit (190 degrees Celsius). Line a baking sheet with parchment paper or lightly grease it. This will prevent any sticking and make cleanup a breeze. Next, open your can of refrigerated pizza dough or crescent rolls. If you’re using pizza dough, unroll it and gently press it out a bit thinner. If you’re using crescent rolls, you might want to pinch the seams together to create a more solid base for your pocket. You can either work with the dough as one large piece and cut it into portions, or if using crescent rolls, separate them into individual triangles. For pizza pockets, I find it easier to cut the pizza dough into roughly 4-inch squares. If you’re using crescent rolls, you’ll typically be working with the individual triangles as your pocket base.
2. Building the Flavorful Filling:
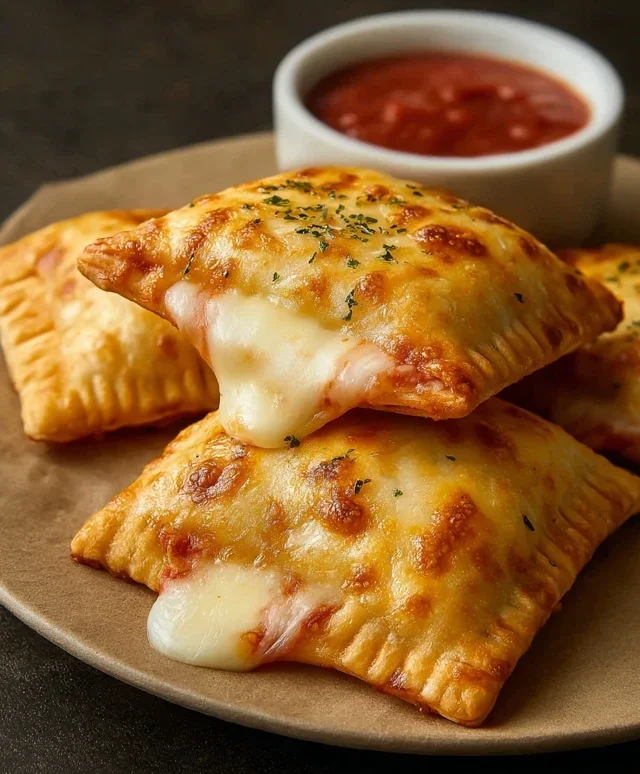
In a small bowl, combine the marinara sauce with the Italian herbs and the powdered garlic. This little mix-and-match creates an extra burst of pizza flavor within your pockets. You can even add a tiny pinch of red pepper flakes here if you like a little heat. Now, it’s time to layer your fillings. On one half of each dough square or crescent roll triangle, spoon about a tablespoon of the seasoned marinara sauce. Be careful not to overfill, as this can make sealing the pockets difficult and lead to sauce escaping during baking. Next, generously sprinkle about a tablespoon of shredded mozzarella cheese over the sauce. This is where the magic happens, that glorious, gooey cheese pull! If you’re using additional toppings like diced beef pepperoni, sautéed mushrooms, or small pieces of cooked sausage, now is the time to add them on top of the cheese. Remember to keep the toppings relatively small so they cook through properly within the pocket.
3. Assembling and Sealing the Pockets:
This is the crucial step for creating those perfect little pockets. If you’re using square pieces of pizza dough, carefully fold the empty half of the dough over the filled half, creating a rectangular pocket. Press the edges firmly to seal. You can use a fork to crimp the edges, which not only helps with sealing but also gives your pockets a nice decorative touch and a more robust structure. If you’re using crescent roll triangles, bring the two longer sides of the triangle together over the filling, creating a crescent shape, or fold the wider end over the filling to form a more enclosed pocket. Again, press the edges to seal tightly. Ensuring a good seal is key to preventing your delicious fillings from escaping during the baking process. A well-senon-alcoholic aled pocket will puff up beautifully and keep all that cheesy goodness contained.
4. Baking to Golden Perfection:
Now, let’s get these beauties into the oven. Carefully place your assembled pizza pockets onto the prepared baking sheet, leaving a little space between each one so they bake evenly. Before they go in, we need to give them that irresistible golden-brown crust. Brush the tops of each pocket with melted butter or olive oil. This not only adds a lovely sheen but also contributes to a crispier, more flavorful exterior. Don’t be shy with the brushing; it makes a difference! For an extra touch of savory flavor, sprinkle some grated Parmesan cheese over the brushed tops. Pop the baking sheet into your preheated oven.
5. The Waiting Game and Enjoyment:
Bake for approximately 12-18 minutes, or until the pockets are puffed up and the dough is a beautiful golden brown. The exact baking time will depend on your oven and the type of dough you used. Keep an eye on them during the last few minutes to prevent burning. Once they look perfectly baked and irresistible, carefully remove the baking sheet from the oven. Let the pizza pockets cool on the baking sheet for a few minutes before transferring them to a wire rack or a serving plate. This allows the cheese to set slightly and prevents them from falling apart when you bite into them. Serve them warm and enjoy the explosion of pizza flavor in every bite! They are fantastic on their own or served with extra marinara sauce for dipping.
Conclusion:
So there you have it – your guide to creating these absolutely irresistible Cheesy Pizza Pockets! This recipe is fantastic because it’s incredibly versatile, remarkably simple to make, and delivers all the gooey, cheesy pizza goodness you crave in a convenient, portable package. They’re perfect for a quick weeknight dinner, a fun lunchbox treat for the kids, or even as a crowd-pleasing appetizer for your next gathering. Don’t be afraid to get creative with your fillings!
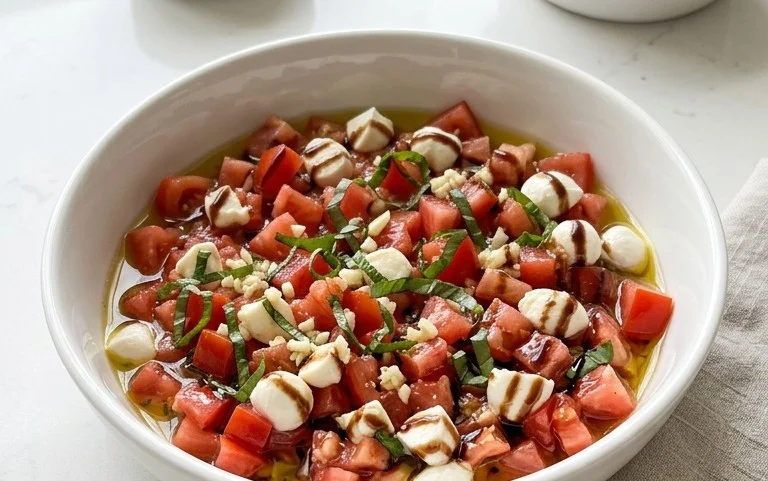
For serving suggestions, I love pairing these with a simple side salad dressed with a light vinaigrette or a bowl of marinara sauce for extra dipping action. The variations are endless! Try adding cooked mini meatballs, sautéed mushrooms and onions, or even a sprinkle of beef pepperoni for that classic pizza flavor. Experimenting is part of the fun, and I truly encourage you to give these Cheesy Pizza Pockets a go. You won’t be disappointed!
Frequently Asked Questions about Cheesy Pizza Pockets:
Can I make these ahead of time?
Yes, you absolutely can! You can prepare the pizza pockets up to the baking stage, cover them tightly, and refrigerate them for up to 24 hours. When you’re ready to bake, you might need to add a few extra minutes to the cooking time. You can also freeze the unbaked pizza pockets and bake them directly from frozen, just be sure to adjust the baking time accordingly.
What kind of cheese works best?
While a classic mozzarella is always a winner for its meltiness, feel free to mix it up! A blend of mozzarella and cheddar provides a nice sharpness, or you could even add a bit of provolone for a richer flavor. Whatever your favorite melting cheese is, it will likely work beautifully in these pockets!
Cheesy Pizza Pockets
Quick and easy cheesy pizza pockets filled with marinara, mozzarella, pepperoni, and herbs.
Ingredients
-
1/2 cup marinara sauce
-
1 cup mozzarella cheese, shredded
-
1 can of pizza dough or crescent rolls, refrigerated
-
1/2 cup beef pepperoni
-
A quarter teaspoon of Italian herbs
-
A light sprinkle of powdered garlic
-
Melted butter or olive oil, to brush on top
-
Some grated Parmesan for finishing
Instructions
-
Step 1
Preheat your oven to 400°F (200°C). Line a baking sheet with parchment paper. -
Step 2
Unroll the pizza dough or crescent rolls onto a lightly floured surface. If using crescent rolls, pinch the seams together to form a single sheet. -
Step 3
Spread a thin layer of marinara sauce over the dough, leaving a small border around the edges. -
Step 4
Sprinkle the shredded mozzarella cheese, pepperoni, Italian herbs, and powdered garlic over the sauce. -
Step 5
Fold the dough over the filling and cut into individual pocket-sized portions (e.g., squares or rectangles). Crimp the edges with a fork to seal. -
Step 6
Place the pockets on the prepared baking sheet. Brush the tops with melted butter or olive oil. -
Step 7
Bake for 10-12 minutes, or until golden brown and the cheese is melted and bubbly. Sprinkle with grated Parmesan before serving.
Important Information
Nutrition Facts (Per Serving)
It is important to consider this information as approximate and not to use it as definitive health advice.
Allergy Information
Please check ingredients for potential allergens and consult a health professional if in doubt.