Easy Ajitama Ramen Eggs – Perfect Marinated Eggs
Ramen eggs, also known as Ajitama, are more than just a topping; they are a culinary revelation that elevates any bowl of noodles into a symphony of flavor and texture. We all know the joy of slurping down a rich, steaming bowl of ramen, but what truly sets an exceptional ramen experience apart? It’s those perfectly marinated, jammy-yolked ramen eggs that melt in your mouth. People adore them for their incredible umami depth and the delightful contrast they bring. The magic of these ramen eggs lies in their transformation; simple eggs are imbued with the savory essence of soy sauce, non-alcoholic mirin, and non-alcoholic sake, creating a deeply satisfying bite that’s both comforting and sophisticated. They’re the secret weapon for bringin extractg a restaurant-quality touch to your homemade ramen, and honestly, I can’t get enough of them!

Ramen Eggs (Ajitsuke Tamago)
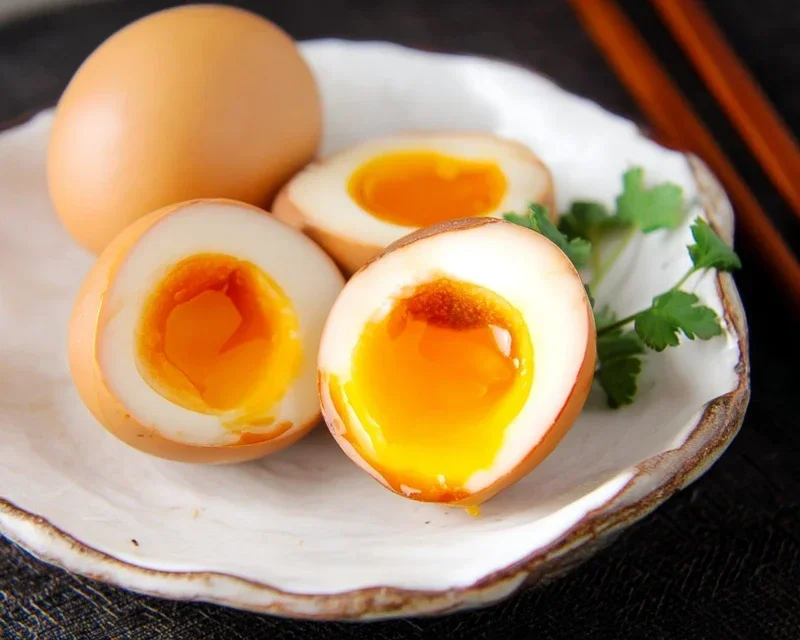
There’s something incredibly satisfying about a perfect ramen egg, also known as ajitsuke tamago, nestled atop a steaming bowl of noodles. The yolk is a glorious, jammy molten gold, and the whites have a subtle, savory sweetness from their marination. While they might seem intimidating, making these delicious ramen toppers at home is surprisingly straightforward. Forget those sad, overcooked eggs you sometimes find; with a little care, you can achieve ramen egg perfection every single time. This recipe focuses on achieving that ideal soft-boiled texture and infusing it with a deeply flavorful marinade.
Ingredients:
Note on Eggs: For the best results, I recommend using eggs that are at least a few days old. Fresher eggs tend to be harder to peel. Also, bringin extractg your eggs to room temperature before boiling can help prevent cracking. If you’re feeling adventurous and want to ensure your yolks are perfectly jammy, I highly recommend using the “cold start” method for boiling, which I’ll detail in the instructions.
Cooking Instructions:
Preparing the Eggs: The Art of the Soft Boil
The key to a perfect ajitsuke tamago lies in achieving the ideal soft-boiled egg. We’re aiming for a partially cooked yolk that’s rich and custardy, not completely solid or runny. I find the “cold start” method to be the most reliable for this. Carefully place your eggs into a saucepan. Add enough cold water to cover the eggs by about an inch. If you’re worried about cracking, you can add a splash of vinegar to the water; it helps to coagulate any escaping egg white quickly. Now, place the saucepan over medium-high heat and bring the water to a rolling boil. The moment the water reaches a full boil, immediately turn off the heat, cover the pot tightly with a lid, and let the eggs sit in the hot water for precisely 6 to 7 minutes. The exact time will depend on the size of your eggs and how jammy you prefer your yolks. For a slightly firmer but still wonderfully gooey yolk, aim for 6 minutes. For a bit more cooked but still molten, go for 7 minutes.
The Ice Bath: Halting the Cooking Process
As soon as the cooking time is up, you need to stop the cooking process immediately to prevent the yolks from hardening further. Prepare a large bowl filled with ice and cold water. Using a slotted spoon, carefully transfer the eggs from the hot water into the ice bath. Let them chill in the ice bath for at least 10-15 minutes. This rapid cooling not only stops the cooking but also makes the eggs much easier to peel. While the eggs are chilling, you can prepare your marinade.
Crafting the Flavorful Marinade
In a small saucepan, combine the soy sauce, water, non-non-non-alcoholic alternativeic non-alcoholic mirin, and granulated sugar. Whisk these ingredients together until the sugar has completely dissolved. Place the saucepan over medium heat and bring the mixture to a gentle simmer, stirring occasionally. You just want to warm it through and ensure everything is well incorporated; you don’t need to boil it vigorously. Once the sugar is dissolved and the marinade is slightly warmed, remove it from the heat and let it cool down to room temperature. Allowing the marinade to cool slightly before adding the eggs will prevent them from overcooking further and will allow the flavors to penetrate more effectively.
Peeling and Marinating: The Marriage of Flavors
Once the eggs are thoroughly chilled and easy to handle, it’s time to peel them. Gently tap each egg on a hard surface to crack the shell all over. Then, starting from the wider end, carefully peel away the shell. If you’ve used older eggs and the ice bath, they should peel quite smoothly. Don’t worry if a few tiny bits of shell cling on; you can rinse them under cool water. Now, for the marination. You’ll need a container that can hold your peeled eggs snugly, with enough room for the marinade to cover them. A zip-top bag or a small glass container works perfectly. Place your peeled, soft-boiled eggs into the container. Pour the cooled marinade over the eggs, ensuring they are fully submerged. If your container is too shallow and the eggs aren’t completely covered, you can top it up with a little extra water or soy sauce to ensure even marination.
The Waiting Game: Patience is a Virtue
This is perhaps the most crucial step, and it requires a bit of patience. Once the eggs are submerged in the marinade, seal the container or bag tightly. Place the container in the refrigerator and let the eggs marinate for at least 4 hours, but ideally for 8 to 24 hours. The longer they marinate, the deeper the flavor will penetrate. I find that 12 to 18 hours gives a wonderful balance of flavor without making the eggs too salty. You can turn the eggs periodically during marination to ensure even coloring and flavor distribution. When you’re ready to serve, carefully remove the ramen eggs from the marinade. You can slice them in half lengthwise, revealing that beautiful jammy yolk, and place them in your ramen bowls. The remaining marinade can be strained and saved to add extra flavor to your ramen broth or other dishes. Enjoy your homemade, restaurant-quality ramen eggs!
Conclusion:
And there you have it – your guide to making perfect Ramen Eggs, also known as Ajitama! This simple recipe yields incredibly flavorful, jammy-yolked masterpieces that will elevate your ramen bowls from good to absolutely unforgettable. The magic lies in the marinade, where simple soy sauce, non-alcoholic mirin, and other aromatics infuse the soft-boiled eggs with a rich umami depth. It’s truly a game-changer for any noodle enthusiast!
These gorgeous Ramen Eggs aren’t just for ramen, though! They’re fantastic sliced over rice bowls, tucked into sandwiches, or even enjoyed as a standalone savory snack. Don’t be afraid to get creative with your marinade too. For a spicy kick, add a touch of sriracha or chili flakes. A splash of non-alcoholic sake can add another layer of complexity. The possibilities are endless, and the reward is so worth it.
I truly encourage you to give this Ramen Egg recipe a try. You’ll be amazed at how such a simple ingredient can bring so much joy and deliciousness to your meals. Happy cooking!
Frequently Asked Questions:
How long do Ramen Eggs last in the refrigerator?
Properly stored in an airtight container, your homemade Ramen Eggs should last for about 3-4 days in the refrigerator. Make sure they are fully submerged in their marinade for the best preservation.
Can I make the marinade ahead of time?
Absolutely! You can prepare the marinade mixture up to a week in advance and store it in an airtight container in the refrigerator. This makes the egg marinating process even quicker when you’re ready.
What kind of eggs should I use for Ramen Eggs?
While you can use any large eggs, fresh eggs tend to peel more easily after soft-boiling. The key is to achieve that perfect jammy yolk, which can take a little practice but is incredibly satisfying once you get it right.
Ramen Eggs (Ajitama)
Perfectly marinated soft-boiled eggs with a jammy yolk and savory coating, ideal for ramen or as a snack.
Ingredients
-
6 large egg
-
Vinegar (optional for boiling eggs)
-
1/2 cup soy sauce (light sodium)
-
1/4 cup water
-
1/4 cup non-alcoholic mirin
-
2 tablespoons granulated sugar
Instructions
-
Step 1
Carefully place eggs in a pot and cover with cold water. Add a splash of vinegar if desired. -
Step 2
Bring water to a rolling boil, then immediately reduce heat to a simmer. Cook for 7 minutes for a jammy yolk. -
Step 3
Prepare an ice bath. Once eggs are done, transfer them immediately to the ice bath to stop the cooking. -
Step 4
In a resealable bag or container, combine soy sauce, water, non-alcoholic mirin, and granulated sugar. Stir until sugar is dissolved. -
Step 5
Gently peel the cooled eggs and place them in the marinade. Ensure they are fully submerged. -
Step 6
Marinate in the refrigerator for at least 4 hours, or preferably overnight, turning occasionally for even coating.
Important Information
Nutrition Facts (Per Serving)
It is important to consider this information as approximate and not to use it as definitive health advice.
Allergy Information
Please check ingredients for potential allergens and consult a health professional if in doubt.