Patriotic Oreo Balls Recipe – Easy Festive Dessert
Patriotic Oreo Balls are an absolute showstopper, and honestly, they’re ridiculously easy to make! If you’re looking for a crowd-pleasing treat that screams celebration, then you’ve landed in the right spot. These delightful bites are a guaranteed hit at any gathering, from Fourth of July barbecues to Memorial Day picnics, or even just a fun way to add some flair to your dessert table. What’s not to love? We take the classic, beloved Oreo cookie, mix it with creamy goodness, and transform it into adorable, bite-sized spheres. But what truly sets these Patriotic Oreo Balls apart is their vibrant, festive makeover. We’ll guide you through turning these simple ingredients into dazzling, edible works of art that are as delicious as they are visually stunning, proving that simple can be spectacular. Get ready to impress everyone with these unforgettable Patriotic Oreo Balls!
Patriotic Oreo Balls
Get ready to wow your friends and family with these incredibly easy and deliciously festive Patriotic Oreo Balls! Perfect for Fourth of July barbecues, Memorial Day picnics, or any occasion that calls for a splash of red, white, and blue, these no-bake treats are a guaranteed crowd-pleaser. The rich, chocolatey goodness of Oreos is perfectly complemented by creamy frosting and a vibrant candy coating, all coming together in a bite-sized explosion of patriotic flavor. What’s even better is that these are incredibly simple to make, requiring minimal fuss and delivering maximum impact. Let’s get started on creating these delightful patriotic delights!
Ingredients:
Making the Oreo Ball Mixture
The foundation of our delicious Patriotic Oreo Balls lies in a simple yet irresistible Oreo and cream cheese mixture. This is where the magic begin extracts, transforming humble cookies into a decadent base. First, we need to crush our Oreo cookies. The easiest way to do this is to place the entire family-size package of Oreos into a food processor. Pulse them until they are finely ground into crum extractbs. You’re looking for a texture that’s similar to coarse sand. If you don’t have a food processor, don’t worry! You can achieve the same result by placing the Oreos in a large resealable plastic bag and then using a rolling pin or even the bottom of a sturdy glass to crush them. Just make sure you get them as fine as possible for the best texture.
Once the Oreos are beautifully crum extractbed, it’s time to introduce the cream cheese. Ensure your 8-ounce block of cream cheese has been softened to room temperature. This is a crucial step because cold cream cheese will be difficult to incorporate evenly and can leave you with a lumpy mixture. You can soften cream cheese by leaving it on the counter for about an hour or by carefully microwaving it in 10-second intervals until it’s pliable but not melted. Add the softened cream cheese directly to the bowl with the Oreo crum extractbs. Now, it’s time to combine them. Using a spatula or your hands (clean hands work best for this!), mix the Oreo crum extractbs and cream cheese together until they are thoroughly incorporated and form a cohesive dough. You should be able to squeeze a handful and have it hold its shape. This mixture will be slightly sticky, which is perfectly normal.
Forming and Chilling the Balls
With our delicious Oreo and cream cheese dough ready, it’s time to shape it into perfect little balls. I find that using a small cookie scoop or a tablespoon to portion out the dough ensures that all your Oreo balls will be roughly the same size, which makes for a more uniform and attractive final product. Roll each portion of dough between your palms until it forms a smooth ball. Don’t worry if they aren’t perfectly round; the candy coating will help to smooth them out. As you form each ball, place them on a baking sheet lined with parchment paper. This is important because it prevents the balls from sticking to the baking sheet.
Once all the dough has been rolled into balls, it’s time for a crucial chilling step. Place the baking sheet with the Oreo balls into the refrigerator for at least 30 minutes. This chilling period is vital for several reasons. Firstly, it firms up the cream cheese mixture, making the balls much easier to handle when you start dipping them in the candy melts. If they are too soft, they can fall apart or become misshapen during the dipping process. Secondly, chilling helps the flavors to meld together beautifully. So, don’t skip this step – it’s a small but significant part of achieving perfectly formed and delicious Oreo balls.
Melting and Dipping the Candy Coats
Now for the fun, colorful part – the candy coating! We’ll be using both red and blue candy melts to create that iconic patriotic look. In separate microwave-safe bowls, place your 12-ounce bag of red candy melts and your 12-ounce bag of blue candy melts. Microwave them in 30-second intervals, stirring well after each interval, until they are completely smooth and melted. Be careful not to overheat candy melts, as they can seize up and become unusable. You want a smooth, pourable consistency.
With your candy melts melted, it’s time to dip our chilled Oreo balls. You can dip them one at a time or in small batches, depending on how many you’re working with. Using a fork or a dipping tool, carefully dip each chilled Oreo ball into the melted candy. Let any excess candy drip back into the bowl. You want a nice, even coating. As you coat them, you can alternate between red and blue to create stripes or even dip some entirely in red and others entirely in blue. For a truly patriotic swirl effect, you can dip a ball in one color, let it set slightly, and then drizzle or dip a second color over it. Once coated, place the dipped Oreo ball back onto the parchment-lined baking sheet.
Adding the White and Stars
To complete our patriotic theme, we’ll add a touch of white and some festive stars. While the red and blue candy melts are still slightly wet on the Oreo balls, it’s the perfect time to add our white star confetti sprinkles. You can sprinkle them on top as soon as you dip the balls, or you can use a toothpick to gently place them on specific spots. For a more defined white element, you can melt your ⅓ cup of Ghirardelli white melting wafers. Again, microwave them in short intervals, stirring frequently, until smooth. Once melted, you can use a spoon or a piping bag with a fine tip to drizzle the white chocolate over the red and blue dipped balls. This creates a lovely contrast and a more intricate design.
After applying the white chocolate drizzle or the star sprinkles, let the candy coating set completely. You can speed this up by placing the baking sheet back into the refrigerator for about 10-15 minutes. Once the candy coating is firm, your Patriotic Oreo Balls are ready to be admired and, more importantly, devoured! These are wonderful for any celebration and are sure to be a hit. Enjoy making and sharing these festive treats!

Conclusion:
And there you have it – a simple yet spectacular recipe for Patriotic Oreo Balls! These no-bake treats are an absolute winner for any gathering, especially during holidays like the Fourth of July or Memorial Day. Their incredible ease of preparation, minimal ingredients, and delightful sweet crunch make them a foolproof crowd-pleaser. Plus, the vibrant red, white, and blue decorations are not only festive but also incredibly fun to create, making them a perfect activity for families. I truly hope you’ll give this recipe a try; it’s guaranteed to be a hit!
Beyond the classic patriotic theme, these versatile Oreo Balls can be adapted for any occasion. Consider using different colored candy melts for birthdays, sporting events, or even just for a fun afternoon treat. You can also experiment with adding a pinch of flavored extract, like peppermint or almond, to the cream cheese mixture for an extra flavor dimension. For serving, they’re perfect on their own, arranged on a festive platter, or even as a delightful addition to a dessert table alongside cookies and brownies. Get creative and make them your own!
Frequently Asked Questions about Patriotic Oreo Balls:
Q: How long do Patriotic Oreo Balls last?
A: Stored in an airtight container in the refrigerator, these delicious treats will stay fresh for about 1 to 2 weeks. The cream cheese is the main ingredient that dictates shelf life, so proper refrigeration is key!
Q: Can I use different cookies besides Oreos?
A: While Oreos provide the ideal texture and flavor, you can experiment with other chocolate sandwich cookies. However, keep in mind that the distinct Oreo flavor is a big part of what makes these so special!
Q: What are the best ways to store leftover Oreo Balls?
A: For optimal freshness and to prevent them from becoming too soft, it’s best to store any leftovers in a single layer in an airtight container in the refrigerator. You can also place parchment paper between layers if you need to stack them.
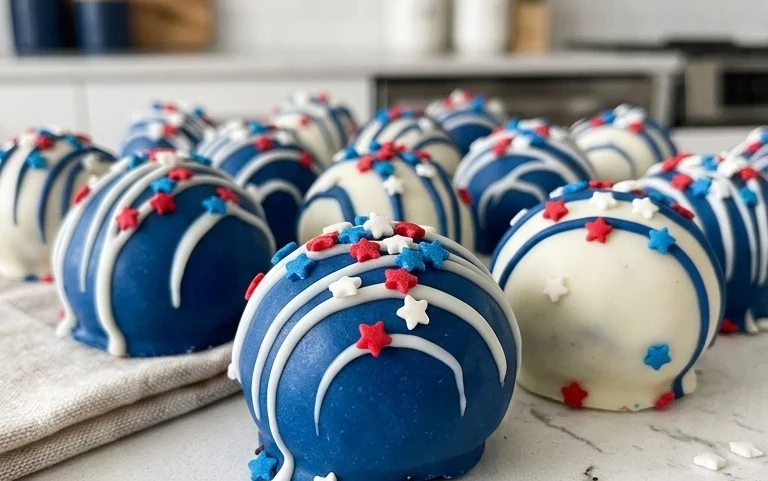
Patriotic Oreo Balls
Festive and easy-to-make Oreo balls decorated with red, white, and blue candy melts and white star sprinkles for a patriotic treat.
Ingredients
-
1 lb 2.12 oz Family Size package Oreo Cookies
-
8 ounce block cream cheese (softened to room temperature)
-
12 ounce bag red candy melts
-
12 ounce bag blue candy melts
-
⅓ cup Ghirardelli white melting wafers
-
White star confetti sprinkles for topping
Instructions
-
Step 1
Crush Oreo cookies into fine crumbs using a food processor or by placing them in a zip-top bag and crushing with a rolling pin. -
Step 2
In a medium bowl, combine the Oreo crumbs with the softened cream cheese. Mix until well combined and a dough-like consistency forms. -
Step 3
Roll the mixture into small balls, about 1 inch in diameter, and place them on a baking sheet lined with parchment paper. -
Step 4
Melt the red and blue candy melts separately in microwave-safe bowls, stirring every 30 seconds until smooth. Melt the Ghirardelli white melting wafers separately. -
Step 5
Dip the Oreo balls into the melted candy coatings, allowing excess to drip off. Place back on the parchment-lined baking sheet. -
Step 6
While the candy melts are still wet, drizzle with the white melting wafers and immediately sprinkle with white star confetti sprinkles. You can alternate colors for a patriotic design. -
Step 7
Allow the Oreo balls to set completely at room temperature or in the refrigerator until firm.
Important Information
Nutrition Facts (Per Serving)
It is important to consider this information as approximate and not to use it as definitive health advice.
Allergy Information
Please check ingredients for potential allergens and consult a health professional if in doubt.