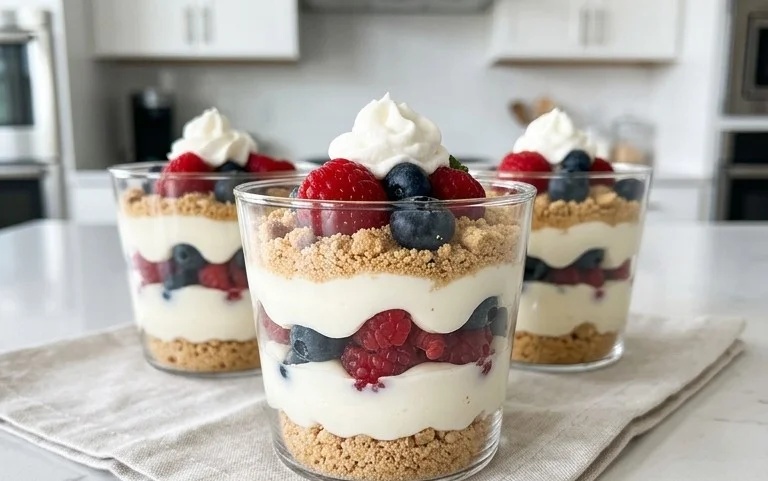
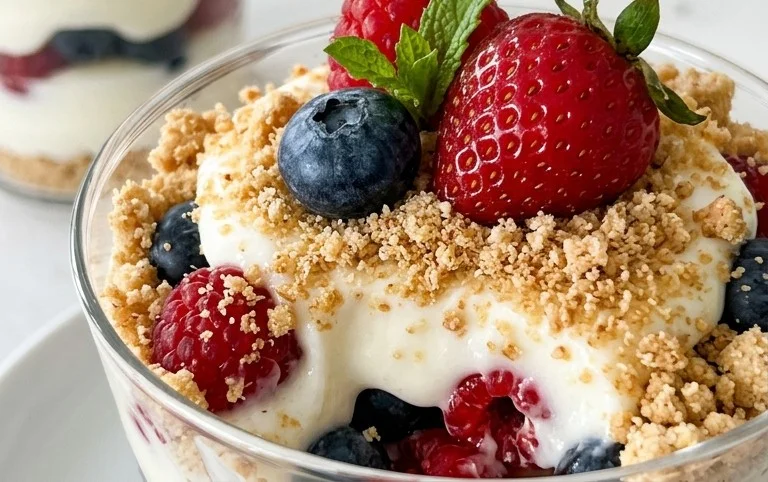
Red White Blue Dirt Cups- Patriotic Dessert Fun
Red, White and Blue Dirt Cups are an absolute showstopper, especially when the patriotic holidays roll around or you’re just craving a fun, festive treat! I don’t know about you, but there’s something incredibly joyful about diggin extractg into a dessert that’s as visually delightful as it is delicious. These individual parfaits are a guaranteed hit with both kids and adults alike, and it’s easy to see why. The magic lies in their simplicity and the irresistible combination of textures and flavors: creamy pudding, crunchy cookie crum extractbles that mimic rich soil, and a vibrant burst of fresh berries. What truly makes these Red, White and Blue Dirt Cups special is how effortlessly they capture the spirit of celebration, making them the perfect centerpiece for any gathering. They’re not just a dessert; they’re an experience, a playful nod to classic flavors with a patriotic twist that always brings smiles.”
Red, White and Blue Dirt Cups
Get ready for a truly festive and incredibly easy dessert that’s perfect for any patriotic celebration or just when you’re craving a fun, no-bake treat! These Red, White and Blue Dirt Cups are a delightful twist on the classic dirt cup, bursting with vibrant colors and satisfying flavors. They’re so simple to make that even the littlest helpers in the kitchen can get involved, and the result is always a crowd-pleaser. Imagin extracte layers of creamy, cool cheesecake pudding, rich chocolatey “dirt,” and pops of gummy worm goodness – it’s a guaranteed hit!
Ingredients:
Let’s Get Baking (Well, Not Exactly!)
The beauty of these dirt cups is that they require absolutely no oven time. We’re focusing on assembling delicious layers of flavor and texture. The cheesecake pudding offers a creamy, slightly tangy base that complements the sweetness of the Oreos. The “dirt” comes from crushed Oreos, giving us that authentic, fun dirt cup look and taste. And of course, the red and blue food coloring adds that essential patriotic flair, making these cups a showstopper for any Fourth of July, Memorial Day, or anytime you want to celebrate America!
Creating the “Dirt”
First things first, let’s prepare our delicious chocolatey “dirt.” Take all 19 Oreo cookies. The easiest way to crush them is to place them in a large zip-top bag. Seal the bag tightly, removing as much air as possible. Then, grab a rolling pin or even the bottom of a sturdy mug and get to work. You want to crush them until they resemble coarse crum extractbs, like actual dirt. Don’t worry about making it perfectly fine; some slightly larger chunks add to the authenticity of the “dirt” effect. You can also pulse them a few times in a food processor if you have one, but be careful not to over-process them into a powder. Set this crushed Oreo mixture aside in a bowl.
Preparing the Pudding Layers
Now, let’s get our creamy pudding ready. In a large mixing bowl, combine the contents of both cheesecake pudding boxes with the 4 cups of milk. Whisk this mixture thoroughly for about 2 minutes, or until it starts to thicken. Pudding mixes often suggest a whisking time, and it’s important to follow those instructions to ensure the pudding sets up properly. You want a smooth, lump-free consistency. Once it’s thickened to your liking, divide the pudding into three separate bowls. This is where the magic happens with the colors!
Coloring the Pudding
In the first bowl, add about half of the red gel food dye. Stir it in until you achieve a vibrant red color. Gel food coloring is more concentrated than liquid, so a little goes a long way. You might not need the full ¼ teaspoon, so add it gradually and stir until you’re happy with the intensity. In the second bowl, add the remaining red gel food dye and the entire ¼ teaspoon of blue gel food dye. Stir this mixture thoroughly. This will create a beautiful purple hue. If you want a more intense purple, you can add a tiny bit more blue or red. In the third bowl, add the remaining blue gel food dye. Again, stir until you have a nice, vibrant blue. This is where you can really get creative! If you have extra time and want more shades, you could even divide the pudding into four bowls and make a pure white layer as well. For this recipe, we’re sticking to red, blue, and a fun purple.
Assembling Your Patriotic Masterpieces
Now for the fun part: assembling! Grab your serving cups or clear glasses. Small clear plastic cups, mason jars, or even dessert dishes work beautifully. Start by spooning a layer of the crushed Oreo “dirt” into the bottom of each cup. This will be our base layer. Next, add a layer of one of your colored puddings. Alternate the colors for a visually appealing effect. For example, you could do a layer of blue, followed by a layer of purple, then a layer of red. Or, get creative with stripes! You can carefully spoon the pudding or use a piping bag (or even a zip-top bag with the corner snipped off) for more precise layering. After each pudding layer, add another light sprinkle of the Oreo “dirt.” This layering creates that iconic dirt cup look. Continue layering the colored puddings and the “dirt” until your cups are almost full, leaving a little space at the top.
The Grand Finnon-alcoholic ale: Worms and More Dirt!
Once you’ve finished layering your pudding and dirt, it’s time for the finishing touches. On top of your last pudding layer, add a generous final layer of the crushed Oreo “dirt.” This should cover the pudding completely, giving the appearance of freshly dug earth. Now, for the pièce de résistance: the gummy worms! Gently push 4 red and blue gummy worms into the “dirt” on top of each cup. You can have them emergin extractg from the dirt, like they’re crawling out, or have them sticking straight up. This adds a fun, playful element that kids (and adults!) will adore. For an extra touch, you could even sprinkle a few extra bits of crushed Oreo around the worms. Chill your Red, White and Blue Dirt Cups in the refrigerator for at least 30 minutes before serving. This allows the pudding to set up completely and the flavors to meld together beautifully. Enjoy your delicious and festive creation!
Conclusion:
I hope you’ve enjoyed learning how to make these vibrant Red, White and Blue Dirt Cups! This recipe is a winner for so many reasons: it’s incredibly easy to assemble, requires no baking, and always a crowd-pleaser, especially for patriotic holidays or summer parties. The combination of creamy chocolate pudding, crunchy cookie crum extractbs, and sweet whipped topping creates a delightful textural and flavor experience that kids and adults alike adore. They are perfect for picnics, BBQs, or simply as a fun, festive treat to brighten any day. Don’t be afraid to get creative with your presentation; individual cups are always charming, but you could also make one large trifle-style dessert!
I highly encourage you to give this Red, White and Blue Dirt Cup recipe a try. It’s a fantastic way to celebrate with a delicious and visually appealing dessert. You can easily adapt it to your preferences. For instance, try using different colored sprinkles for an extra pop, or perhaps add some fresh berries for a fruity twist alongside the layers. Consider mini chocolate chips or even a swirl of strawberry or raspberry sauce between the pudding layers for an added dimension. The simplicity of this recipe means you can focus on the fun of decorating and sharing!
Frequently Asked Questions:
Can I make these dirt cups ahead of time?
Absolutely! These Red, White and Blue Dirt Cups are perfect for making ahead. I recommend assembling them a few hours in advance, but no more than a day. Store them covered in the refrigerator. The cookies may soften slightly over time, which some people actually prefer, but keeping them overnight can make them quite soft.
What are some other topping ideas besides whipped cream and sprinkles?
You have so many options! Consider adding gummy worms peeking out of the “dirt,” using different colored candies like M&Ms or star-shaped sprinkles, or even topping with a dollop of fruit-flavored yogurt for a tangier contrast. Fresh blueberries or sliced strawberries can also add a lovely, natural sweetness and color.
Red, White and Blue Dirt Cups
A festive and simple dessert featuring layers of creamy pudding, crushed Oreos, and colorful gummy worms, perfect for patriotic celebrations.
Ingredients
-
2 boxes cheesecake pudding (3.4 ounces each)
-
4 cups milk
-
19 Oreo cookies (crushed)
-
¼ teaspoon red gel food dye
-
¼ teaspoon blue gel food dye
-
8 red and blue gummy worms
Instructions
-
Step 1
In a large bowl, whisk together the cheesecake pudding mix and milk until smooth and thickened. Let it sit for 5 minutes. -
Step 2
Divide the pudding into three bowls. Leave one bowl plain for the ‘white’ layer. Stir red gel food dye into the second bowl and blue gel food dye into the third bowl until evenly colored. -
Step 3
Spoon a layer of crushed Oreo cookies into the bottom of each serving cup or jar. -
Step 4
Layer the white pudding over the crushed cookies. Follow with a layer of red pudding, then a layer of blue pudding. -
Step 5
Repeat the layering process until the cups are nearly full, ending with the blue pudding layer for a ‘sky’ effect. -
Step 6
Top each cup with more crushed Oreo cookies to resemble ‘dirt’. -
Step 7
Decorate each dirt cup with one or two red and blue gummy worms, partially burying them in the ‘dirt’. -
Step 8
Chill the dirt cups in the refrigerator for at least 30 minutes before serving.
Important Information
Nutrition Facts (Per Serving)
It is important to consider this information as approximate and not to use it as definitive health advice.
Allergy Information
Please check ingredients for potential allergens and consult a health professional if in doubt.